H-Arp Manual
DAW Setup
Note H-Arp is a MIDI plugin that sends MIDI data to other plugin instruments and needs to be routed appropriately before you will hear the results.
Below are setup guides covering common DAWs, with some easier to set up than others. If yours isn't listed it is likely to be similar to the Cubase approach. I welcome any feedback on DAWs not listed or improvements to below.
I also describe how to set up in plugin hosts towards the end of this page.
Each numbered step on a screenshot corresponds to the numbered step underneath.
- Unsupported DAWs/Platforms
- Getting Started
- Ableton Live
- Bitwig
- Cubase
- FL Studio
- Logic
- Reaper
- Renoise
- Studio One
- Plugin Hosts
1. Unsupported DAWs/Platforms
64-bit VST3/AU support is required by the DAW.
Note plugin hosts / wrappers mentioned further down can allow unsupported DAWs to function.
- Garageband, Reason - don't support MIDI plugins as far as I know.
- Pro Tools* - AAX not currently supported (is there demand here? Let me know).
- Linux - not currently supported.
2. Getting Started
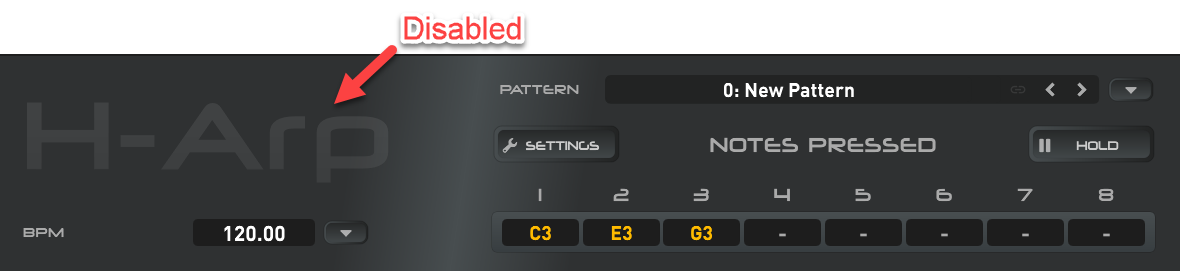
The first thing to do is to start an H-Arp plugin instance and I recommend turning off the arp by pressing the logo to grey it out. This will let notes you play on your keyboard straight through and let us test we're triggering our instrument. Clicking the logo again turns the arp on.
Once you do hear notes playing I'd recommend clicking pattern ("New Pattern" at top below), choosing Load Demo Patterns, then click it again and select one of the demo patterns. Next play your MIDI keyboard into H-Arp to hear and see the result.
3. Ableton Live
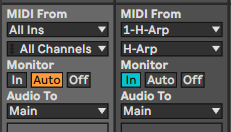
Approach: Two tracks, arp set as input to instrument. Note monitor buttons both need to be on.
MIDI export drag & drop to timeline supported: Yes
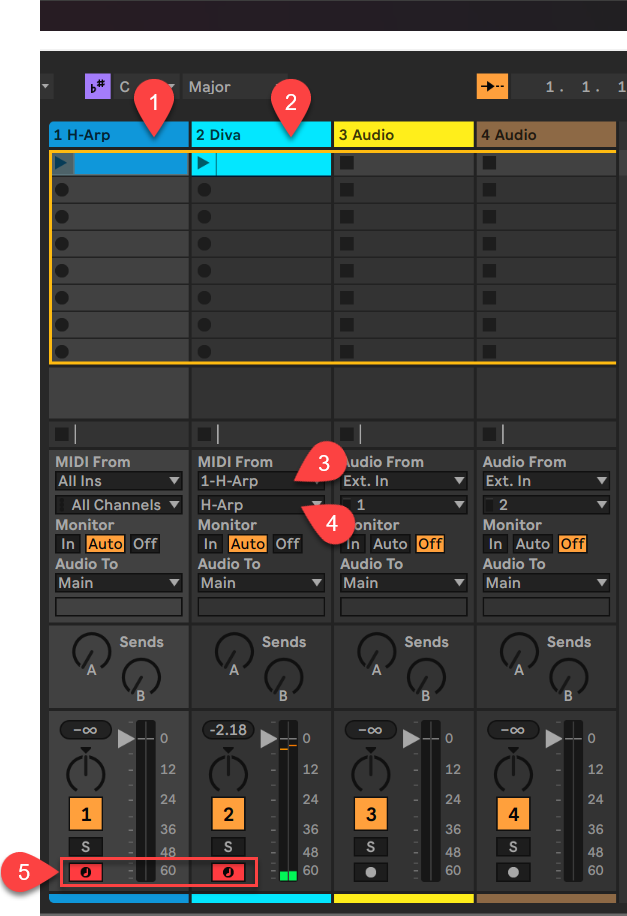
- Add H-Arp plugin to a MIDI track.
- Add the plugin instrument you want to trigger (Diva is the example above) onto the next MIDI track.
- On the instrument track (Diva in this example), ensure H-Arp is selected in the MIDI From source (it will be near the bottom of the list).
- Just below this also ensure H-Arp is selected in the next Post Fx box.
- Finally, ensure both tracks are armed (ctrl/control click). OR (better approach!), set Monitor to In on the destination instrument track (2 Diva in this example).
4. Bitwig
Approach: Two devices next to each other (easiest) or two track approach.
MIDI export drag & drop to timeline supported: Yes
4.1 Approach 1 (easiest)
Insert an instance of H-Arp before the instrument you want to arpeggiate. Note if using the + button to add, you will need to adjust the filter to Any Device Type to see H-Arp if an instrument is already in place. That's it, just two devices next to each other and it routes as expected.
4.2 Approach 2
Bitwig can also use the two track approach discussed elsewhere, H-Arp on one track, the instrument on another. Before the instrument add a Note Receiver device and choose H-Arp. In this mode you can record H-Arps output.
5. Cubase
Approach: Two tracks, arp set as input to instrument. Note monitor buttons both need to be on.
MIDI export drag & drop to timeline supported: Yes
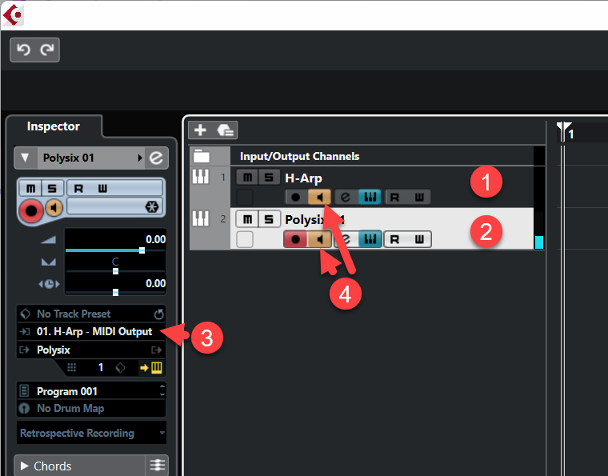
- Add H-Arp to an instrument track.
- Add the instrument you wish to arpeggiate (Polysix in this example).
- On the left for e.g. Polysix, select H-Arp as the MIDI input.
- Ensure both monitor buttons are enabled. Arming the record button on the instrument can record H-Arp's output.
6. FL Studio
Approach: Two tracks, line up port numbers to route.
MIDI export drag & drop to timeline supported: Yes
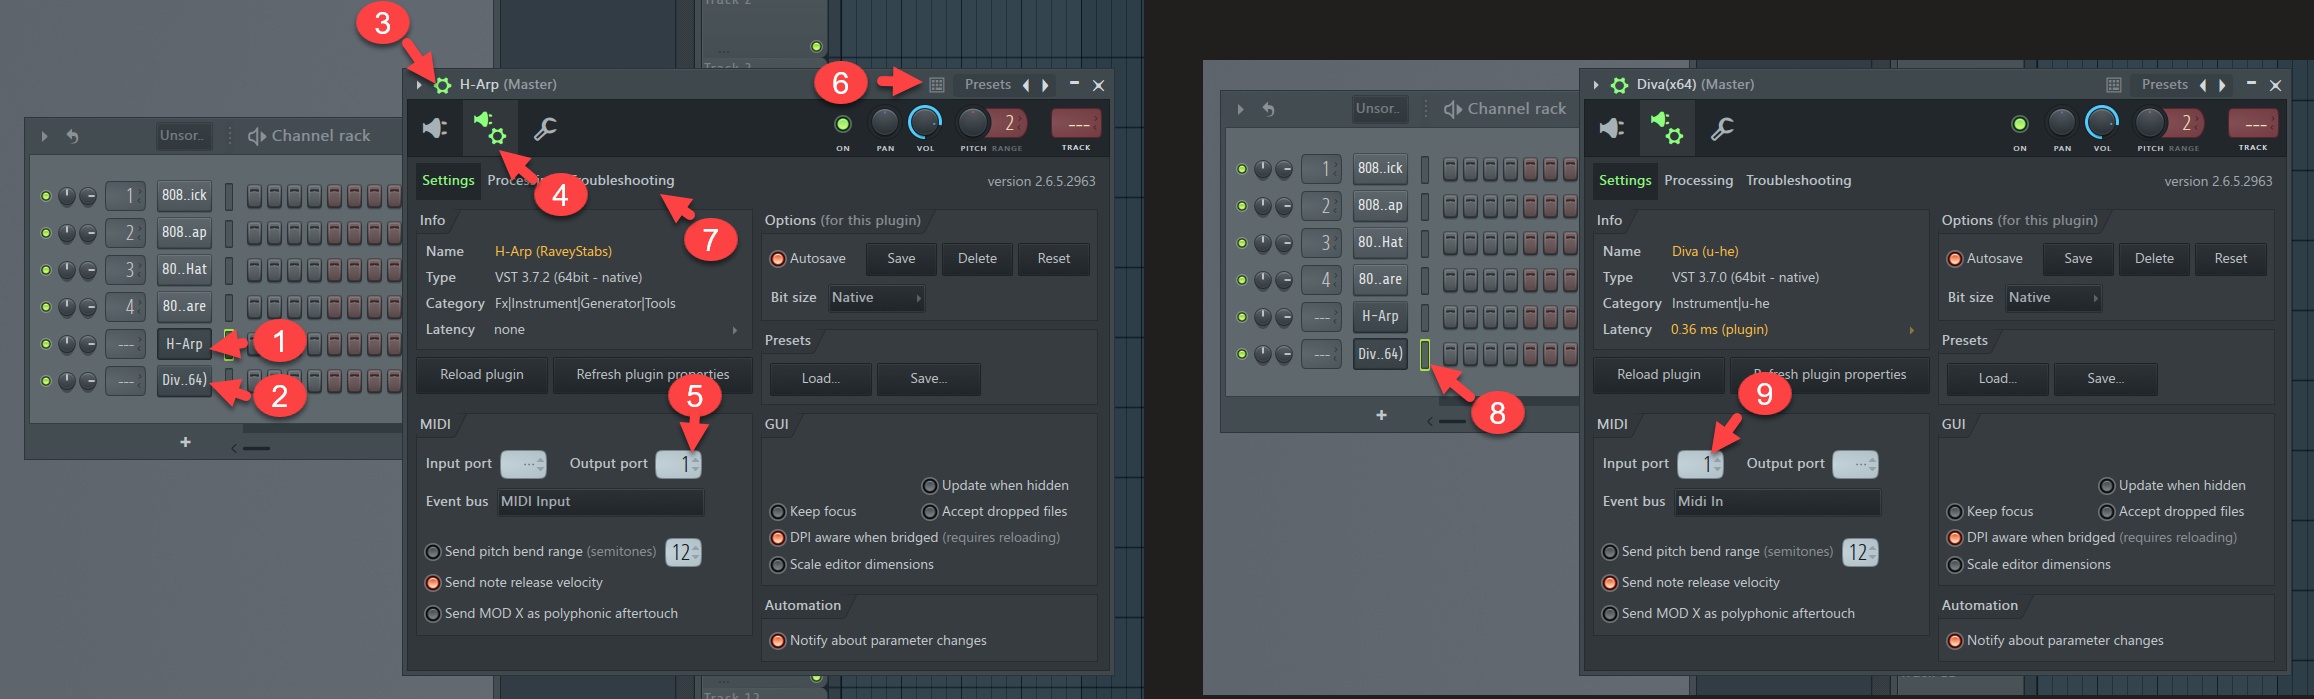
- Add H-Arp to an instrument track.
- Add an instrument you wish to trigger (as I understand, only external instrument plugins can be VST MIDI chained in FL Studio).
- Click the cog in the H-Arp window.
- Then the 2nd Cog tab.
- Set a MIDI output port, e.g. 1.
- It may be useful to turn on allow plugin keystrokes before… to give keyboard control to H-Arp.
- (Optional) In the Troubleshooting tab, there is a Use fixed size buffers option. Turn this on if you experience problems, specifically timing/synchronisation issues, but in theory shouldn't be required.
- For the target instrument, open this same area (Diva in this example) and go into the same settings area (per 3 & 4).
- Select the Input port to match that of the previous Output port set. For more than one instance, use different numbers to isolate instances e.g. 2,2 or 3,3, or the same can be used in the Input port to layer. H-Arp will now trigger the instrument when it's track has focus.
7. Logic
Approach: Single track, insert slot before instrument.
MIDI export drag & drop to timeline supported: Yes
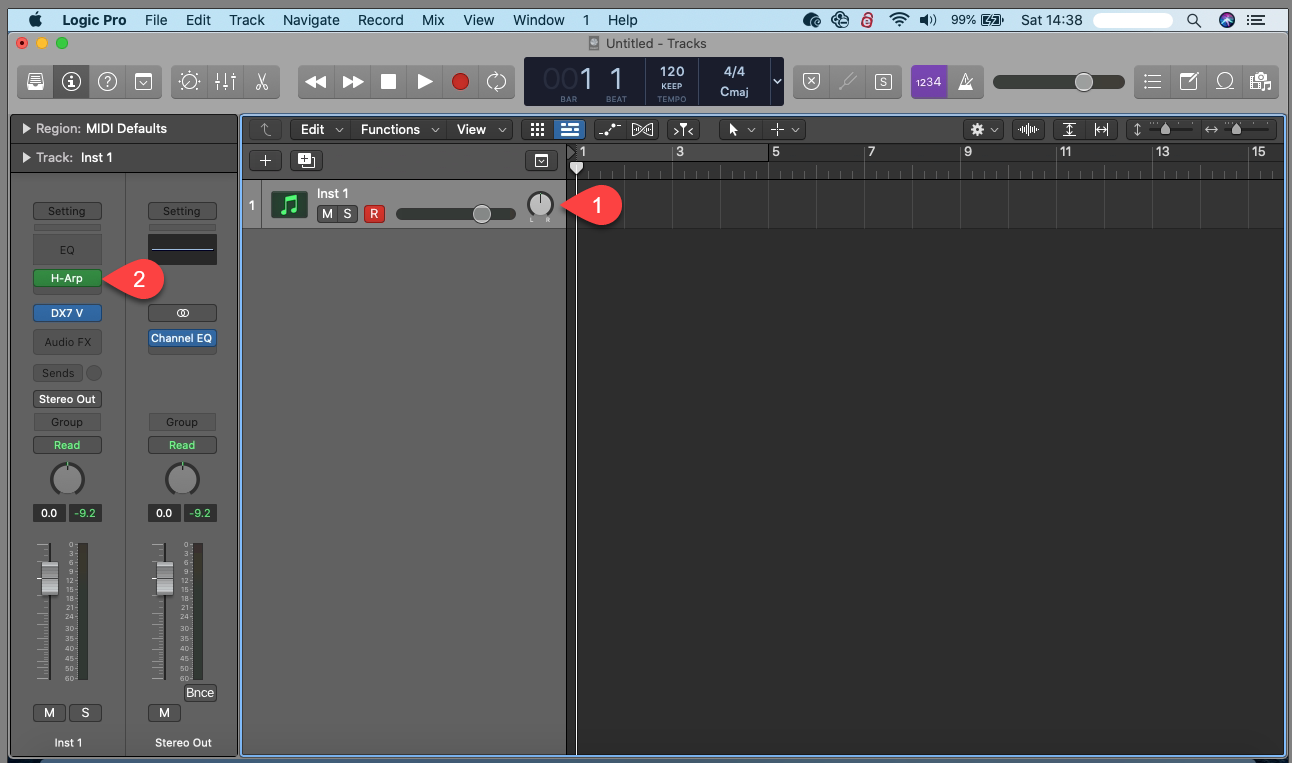
- Add an instrument track with a software instrument of your choosing (in this case DX7 V).
- In the MIDI FX box, choose Audio Units > RaveyStabs > H-Arp.
Note using Logic's "Musical Typing" qwerty keyboard input will steal keystrokes from H-Arp so it not recommended to use it (use an external MIDI keyboard instead).
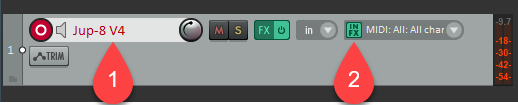
8. Reaper
Approach: Single track, insert slot before instrument.
MIDI export drag & drop to timeline supported: Yes
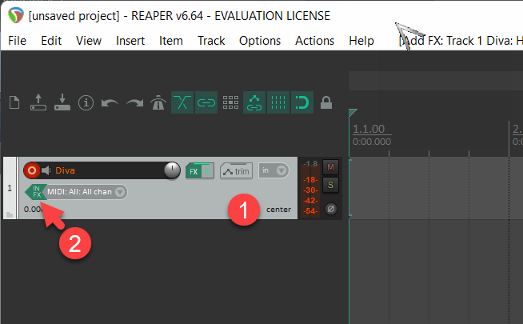
- Add a new track (Insert virtual instrument on new track) and choose the instrument you want to trigger (Diva in this example).
- Click IN FX and choose H-Arp.
In later version:
9. Renoise
Approach: Two instruments and route MIDI.
MIDI export drag & drop to timeline tracker editor supported: Yes but some workarounds required, see below.
Issues: There is a bug in Renoise if plugin sandboxing is set to Always (vs When Required) that causes timing jitter when receiving the MIDI from H-Arp and other similar MIDI plugins. They are currently looking into this.
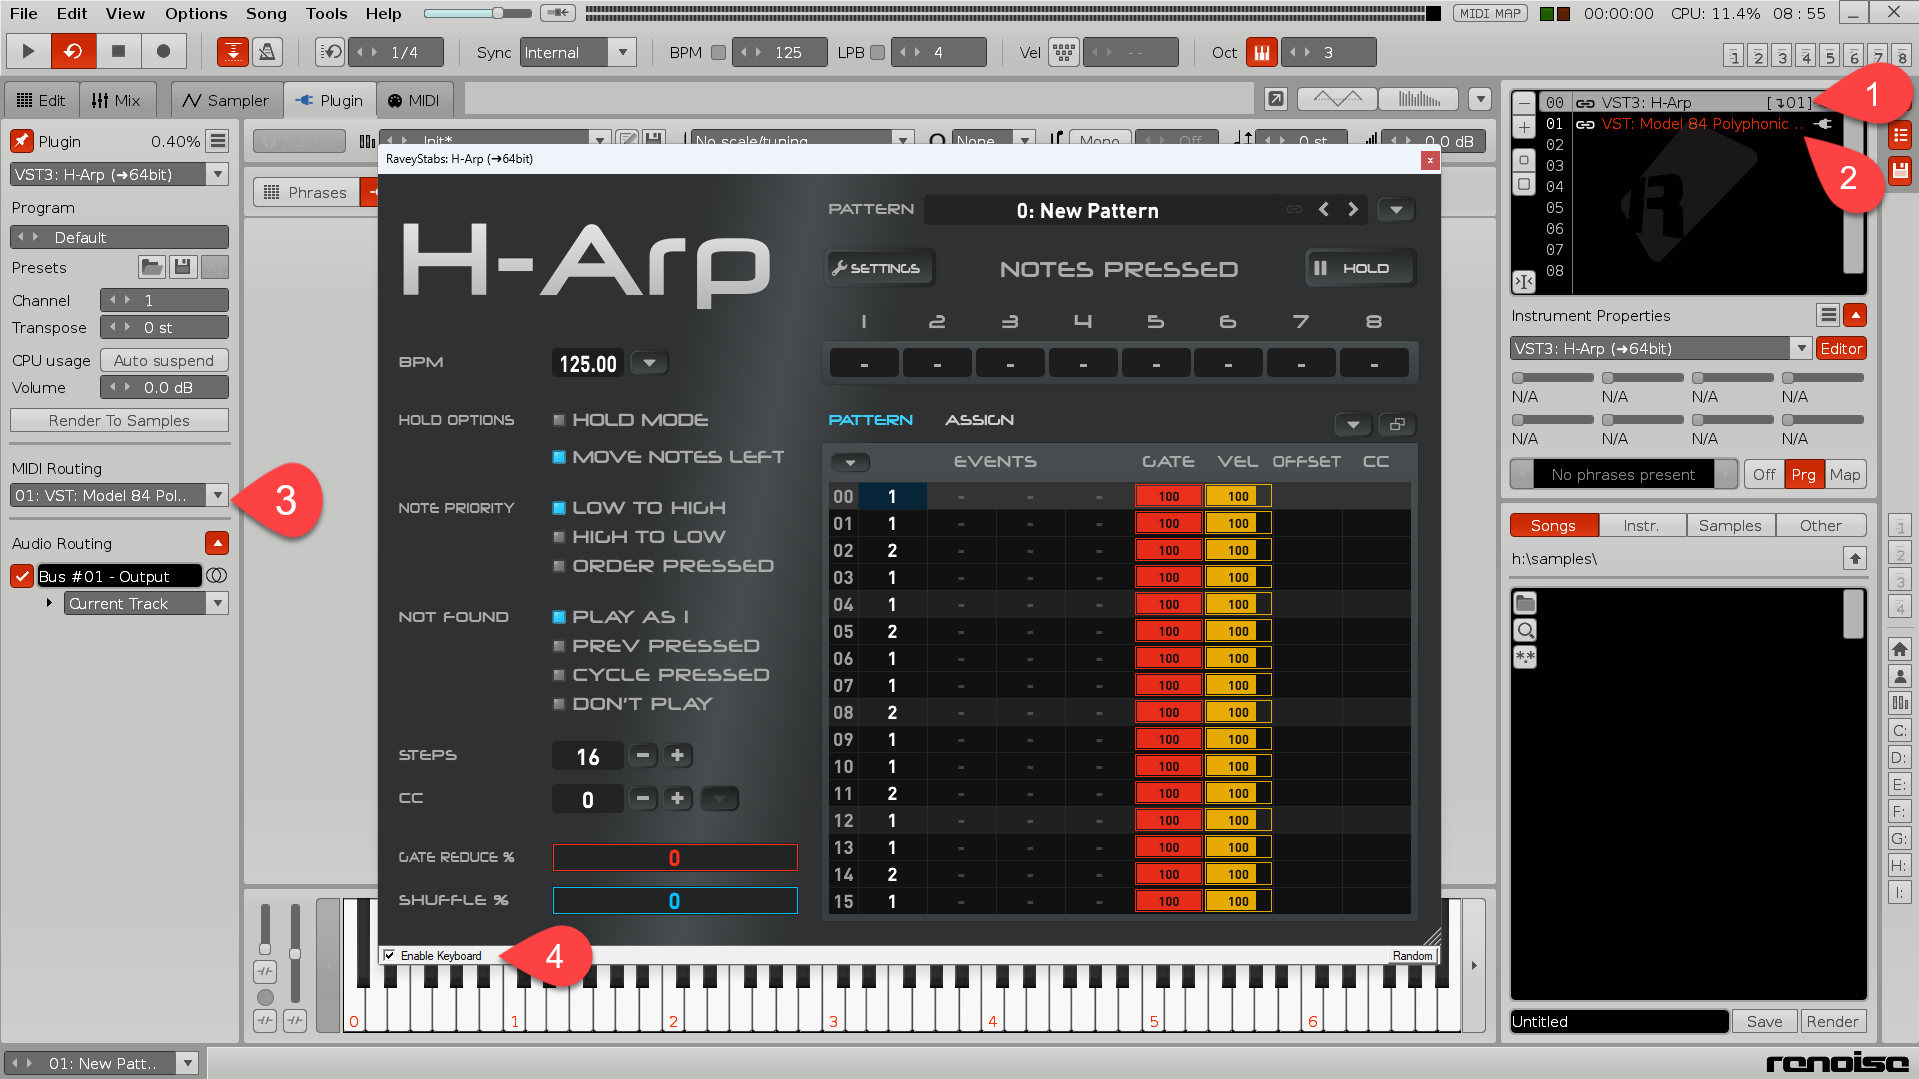
- Add H-Arp as a plugin instrument.
- Add another instrument (i.e. can be a plugin or sampler). This must be after H-Arp (or you'll get a notification in step 3 to swap).
- Route H-Arp to the other instrument (select the H-Arp instrument first then route to destination, Model 84 in this example).
- Ensure Enable Keyboard is On (otherwise Renoise will react to the keystrokes too when editing).
When using MIDI export drag to first Edit tab, or show Edit tab then reshow H-Arp plugin and drag. Note the following:
- Renoise will always create a new instrument, pattern and track for the imported MIDI data. That track may be located far right, i.e. it won't target where dragged to and may be off screen.
- The MIDI will map to a new empty created instrument, which will likely need to be rerouted back to the one you want to use by changing the instrument number column (say from 02 to 01 in this example below). You will likely also want to cut the note data into a pattern/position you want and delete the added track.
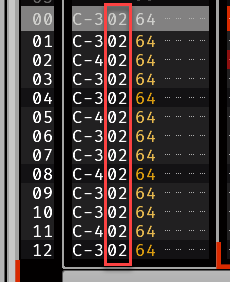
- Trigger H-Arp using its instrument number and chords as expected (expand the note columns of the track or target the same H-Arp instrument from different tracks for chords).
10. Studio One
Two track approach, two different routing options.
MIDI export drag & drop to timeline supported: Yes
10.1 Approach 1 (best, but plugin instruments only, no external MIDI)
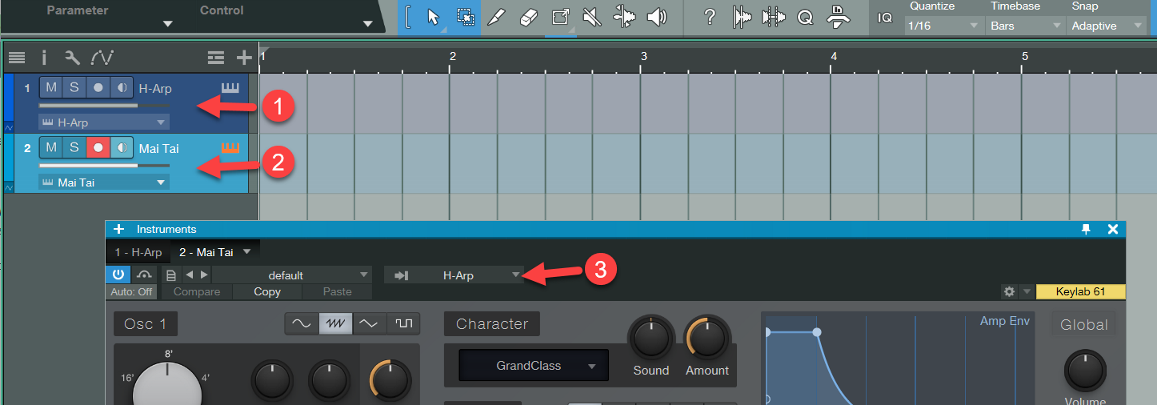
- Add H-Arp to a new instrument track.
- Add the VST instrument you wish to trigger to a new instrument track (Mai Tai in this example).
- On the target plugin window (e.g. Mai Tai), select H-Arp as the input (if multiple list, choose the first).
10.2 Approach 2
Similar to Cubase.

- Add H-Arp to a new instrument track.
- Add the VST instrument you wish to trigger to a new instrument (Mai Tai in this example).
- Expand each track's height by dragging and on the target plugin track (e.g. Mai Tai), select H-Arp as the source.
- Ensure both monitor buttons are turned on. Moving between tracks can auto turn them off, there are option in the tools menu (3rd icon above) to make them more sticky (but have other downsides). Also if you have record armed on the instrument track (e.g. Mai Tai), you can record H-Arp's MIDI output in this mode.
11. Plugin Hosts
Plugins that host other plugins can allow for easier MIDI routing and their setup made a preset for easy recall. They can allow hosts that don't directly support plugin formats or MIDI to work, or just make it simpler in DAWs where MIDI routing is less easy.
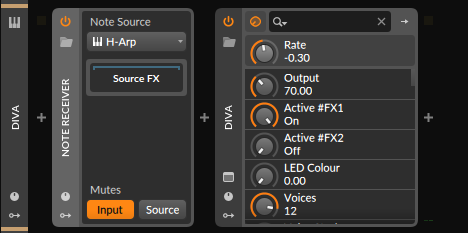
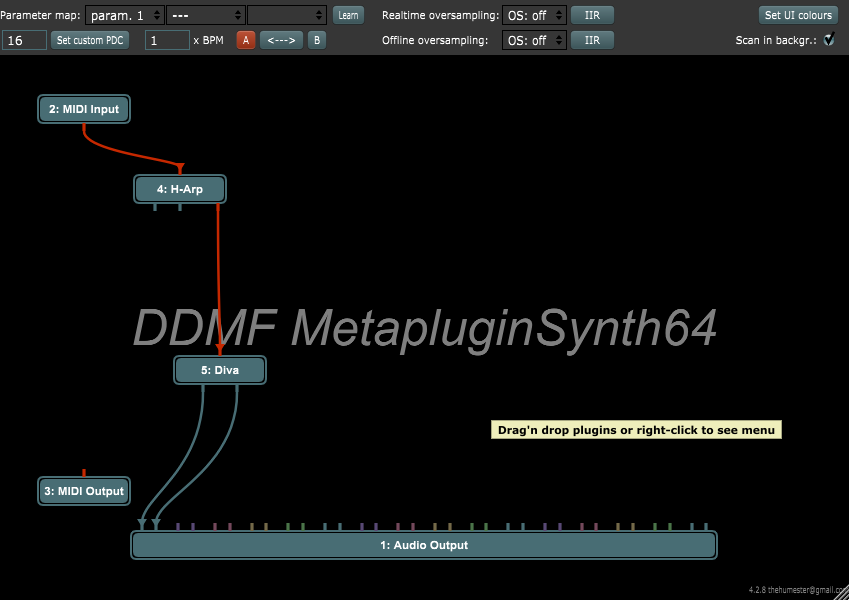
11.1 Metaplugin (DDMF)
Below is a setup illustrating H-Arp's MIDI being routed to DIva, and Diva's audio routed out.
11.2 Element (Kushview)
A free plugin host similar to Metaplugin, routing below.
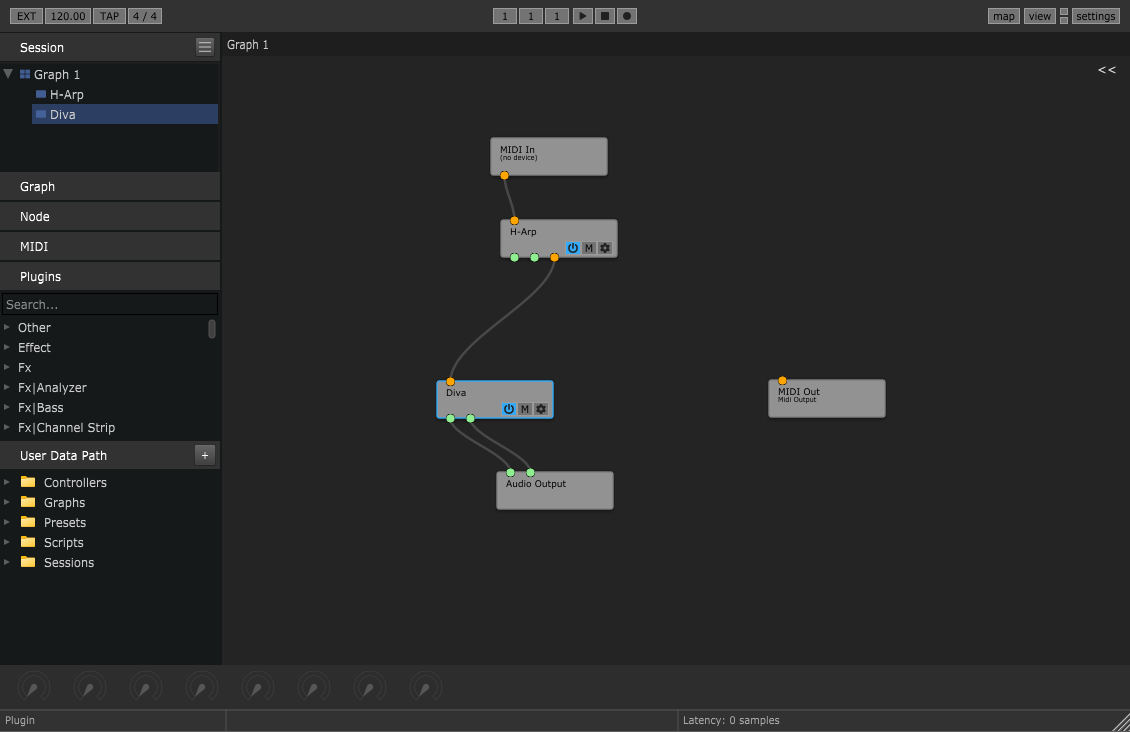
For both you can route H-Arp's MIDI to the MIDI Out device also, which makes it recordable (or you can use drag and drop export in the plugin).