H-Arp Manual
Interface & Menus
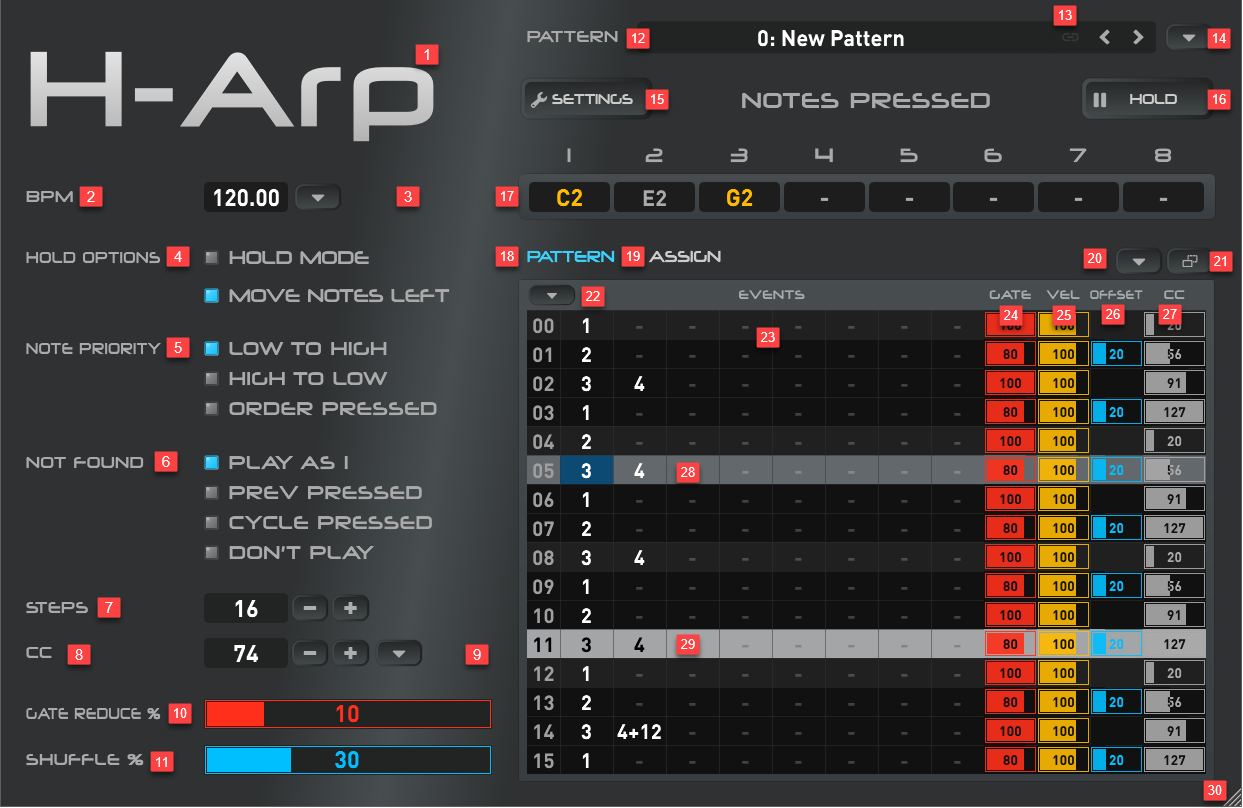
Interface overview.
| 1 | H-Arp logo. Clicking this toggles the arp on and off (off when faded out). The can let you audition an instrument without the arp engaged and you'll notice notes (17) appear, which can still be held (16). |
| 2 | BPM - the current BPM taken from the DAW. May change if a speed adjustment from the BPM menu (3) is made. |
| 3 | BPM menu (see below). |
| 4 | Hold options. Hold mode means pressed notes or chords automatically get held and the arp will continue to play until the next note or chord is pressed and switch to that instead. To stop the arp, press Hold button (16), turn off Hold mode, or if sustain pedal is in hold toggle mode, this can also change this option. Move notes left - this is on by default. If you have a chord held, and in the example above were to release the first two notes in slots 1 & 2, with this off 3 would remain where it is instead of moving to the left into 1's slot and new keys maybe inserted before it (depending on the current Note Priority mode, which dictates how they are arranged). |
| 5 | Note priority. This dictates how the pressed notes (17) are arranged. Low to high (default) will order by the lowest notes on your MIDI keyboard first into the slots. High to low by the highest first, and order pressed by the sequence you pressed them in. Sometimes pressing this after creating a pattern can be interesting. |
| 6 | Not found. Determines what happens when an event slot number is placed in the grid (23) but it has no corresponding note pressed (17). In the example above, we have a 4 in the third row, but no note in slot 4. Play as 1 would revert to playing the 1st slot (C2) instead, Prev Pressed would fallback to the 3rd slot (G2). Cycle pressed uses a cycle algorithm, which in this case is 4 minus 3 (the total number of held notes) causing it to cycle it back to slot 1. Don't Play simply doesn't play the note. |
| 7 | Steps. The number of steps in the current pattern, by default it is 16, which is the maximum. However, you can chain patterns to go way beyond this. |
| 8 | CC. The current controller number being viewed, in this case 74, with the CC column (27) showing the values being sent. See CCs for more info. |
| 9 | CCs used dropdown menu. Lists all CCs int use by the grid for quick access. |
| 10 | Gate reduce %. Gate is the length and under the hood this adjusts the Gate (24) globally (without representing it on the grid). This is useful for overall making note lengths a bit shorter (up to 50%). Some equipment, especially hardware, may requires lengths to be slightly shortened to sound right. A gate reduction of 10% will play 90% of the current length, is how it works for example. |
| 11 | Shuffle. Turning this up adds a start offset delay (26) on even rows, creating a shuffle effect. Note offsets on even rows (26) are not editable when shuffle is engaged. |
| 12 | Pattern. Shows the current pattern, with navigation buttons on the far right to go between them. |
| 13 | Pattern chain. This causes the current pattern to link with the previous pattern (if it exists) and both will be played in sequence one after the other. As many patterns as you want can be chained in this way. |
| 14 | Pattern menu. Contains options for management (e.g. adding, deleting, renaming, moving) patterns (see below). |
| 15 | Settings menu (see below). |
| 16 | Hold button (does a few different things). In brief, if notes are pressed on the MIDI keyword, pressing this will hold them (make them stick). You can press additional MIDI notes and press hold again to add them to the held collection. Holding can free up your hands for editing. If no MIDI notes are pressed and hold mode is on, pressing it again will clear the held notes notes and stop playing. Pressing it when empty will restore the last held notes (if they exist). |
| 17 | The currently pressed MIDI notes. If they are "held" using the hold button or hold mode, they are shown with a blueish background per above (skin dependent). |
| 18 | Pattern tab (currently shown). |
| 19 | Assign tab. Allows designated MIDI notes to play chords, change to different patterns, or both. |
| 20 | MIDI export options. |
| 21 | MIDI export drag and drop button. Click and pull this to export MIDI onto your DAW's timeline (where supported), or to an explorer/finder location to export a MIDI file. |
| 22 | Pattern edit options. |
| 23 | Events area, where numbers are placed that correspond to the currently pressed/held notes (17). Enlarging or shrinking the interface (30) will dictate if 4 or 8 columns are shown. |
| 24 | Gate. This is the current step's note duration. 100 (%) means the length is exactly 1/16 step long. 25 is a quarter, 50 is half of that and so on. Use + or - keys to adjust or type in a number. |
| 25 | Velocity. This is how much velocity is on the current step. |
| 26 | Start offset. The delay before playing the current step. Shuffle (11) delays even steps to create shuffle but you can set your own and you might humanise a sequence using this for example. |
| 27 | The current CC value to send (related to the CC set in 8). |
| 28 | The row currently editing, indicated in a darker grey with blue indicating the focused cell (skin dependent). |
| 29 | The current playing row, if the arp is playing. |
| 30 | Resize control. The interface can be resized easily. To make the current size stick, see the Settings menu > Set this window size as default (15). |
1. BPM Menu (3)
| Speed | Normal (default), Double, Half or 3/4s. These affect playback speed of the arp and related to the current BPM in the DAW, effectively multiplying that BPM by 1, 2, 0.5 or 0.75 respectively. Sometimes it is useful to temporarily slow down playback in order to nail a performance recording (MIDI export can convert back to original tempo). Other times you may just want slower or double. Double can offer a bit more resolution for triplet notes or CC sending for example. |
| Playback Starts | These options relate to when your DAW is playing back and act as an opening quantise for when the arp should start. Every step will start on the next exact step, Every 4 (default) will wait until next iteration of even 4 steps before playback commences. These options can be handy to ensure the arp starts playing correctly when improvising. |
2. Pattern Menu (14)
| Add New (Ctrl / Control and Insert) | Adds a new pattern to the end. |
| Rename (Ctrl / Control + F2) | Renames the current pattern. |
| Copy (Ctrl / Control + F4) | Copies the current pattern. |
| Paste (Ctrl / Control + F5) | Pastes the current pattern over the top of the current. |
| Duplicate (Ctrl / Control + F6) | Duplicates the current pattern, inserting a copy directly after. |
| Duplicate and chain after (Ctrl / Control + F7) | Same as previous, but automatically switches on pattern chaining for the duplicate (13). A quick way of cloning and extending to make a variation to a 2nd part essentially. |
| Clear (Ctrl + F3) | Clears the current pattern (asks to confirm). |
| Delete (Ctrl + Del) | Deletes the current pattern (asks to confirm). |
| Previous pattern (Ctrl / Control and Up Arrow) | Moves to the previous pattern - same as pressing the left arrow in pattern area (12). |
| Next pattern (Ctrl / Control and Down Arrow) | Moves to the next pattern - same as pressing the right arrow in pattern area (12). |
| Move pattern up (Ctrl / Control + Shift + Alt / Option + Arrow Down) | Moves the pattern up in the list of patterns, allowing you to reorder patterns (useful for arranging chains). |
| Move pattern down (Ctrl / Control + Shift + Alt / Option + Arrow Up) | Same as previous but down. |
| Clear pressed notes (Esc) | Clears any held notes - same as pressing Hold button (16) if nothing pressed on MIDI keyboard. |
| Restore last held notes (F11) | Restores the last held notes, the notes held using the Hold button (16) or Hold mode (4). |
| Restore last pressed notes (F12) | Similar to previous, but applies to the last pressed notes, regardless if they were "held" or not. |
| Chain this pattern after previous (F10) | Same as 13, links this pattern to be played after previous. Note the shortcut key, it can be handy to disengage this for editing, then re-engage to link back in again. |
3. Settings Menu (15)
The settings menu is divided into two halfs:
- Global - setting preferences that affect all instances of the plugin.
- Instance - settings that are specific to the current instance of the plugin only.
Global
| Send all notes off | In the event of notes getting stuck, you can use this to send the "all notes off" message to help unstick. Pressing ctrl and this option does a more thorough notes off should the plugin/hardware not support standard all notes off message. |
| Send CCs while editing | When you are inputting CC values (27), they are instantly sent out. This is useful for pairing, but may not always be desirable, such as when playback is engaged, so can be turned off. |
| Use numpad | If unticked, the arp won't utilise the numpad keys, freeing them up to be passed onto the DAW. It is common for numpad keys to set playback start locations for example. In that same way, the space key (often play/stop) is not utilised by the plugin. Note, some DAWs may not distinguish the numeric keypad from other numbers (Bitwig for example), so this option may have no effect there. |
| Set this window size as default | After you've resized the plugin window (30), you can set it as the default size for all instances. |
| Open GL | On by default, switch off if troubleshooting. Requires plugin window to be closed and re-opened. |
| Set custom window size | Lets you input window size co-ordinates. |
| Grid numbering starts from | The rows on the pattern can start at 0 (going to 15) or start from 1 (going to 16). Tracker users will be familiar with the former, since it gives even 4s in 0, 4, 8, 12 etc. Non-tracker users may prefer the former. This setting affects a few areas including the pattern numbering starting from 0 or 1 and the assign list also. |
| Grid wrapping | When using the arrow keys to navigate the grid and you come to the bottom, top, left, right edge of the grid, this setting dictates what happens when you try to move beyond the boundaries. Wrapping on will wrap back to the start (or end if at the start), if off the cursor will go no further and be confined to the edge. The former is used in trackers. |
| Grid wrap between chained patterns | When the bottom or top of the grid is reached with the arrow keys, if this is on and patterns have been chained, then it will continue to progress onto the next or previous pattern, as if you are editing one large pattern. |
| Middle C | Can be C3 or C4, and dictates how notes are displayed in the Notes Pressed area (17). |
| Sustain pedal | The sustain pedal can be assigned to various things. Thru: regular sustain behaviour passed though, Run arp: keeps the arp running whilst pedal engaged (can free up hands from notes), Toggle hold mode: toggles the hold mode each pedal press. |
| Default velocity | For new patterns or when clearing a velocity in the velocity column (25), the velocity will default to one of these 3 values. |
| Theme | Dark or Light display mode. |
| Get Full Version or Licensed | To update to the full version, this screen contains links to purchase and activate. If already upgraded, it will be disabled with the words "Licensed". |
| Check for updates on startup | Pings the server to see if an update is available. |
| About | Credits page the links to website and update check. |
Instance
| All patterns have same note priority & not found | If on (default), all patterns created will share these two options (5) and (6), and if off they will be specific to the current pattern. |
| Offline delay | When the sequencer is not playing, this introduces a slight delay before playback starts. If playing opening chords, this allows time for first the chord to be played before playback begins, since humans never strike all notes of a chord at exactly the same time and short audio buffer sizes can cause the chord not to register for the first step. |
4. Pattern Edit Menu (22)
Grid Edit
| Cut, Copy, Paste, Delete (Ctrl / Control + X, C, V; Del) | Common methods that can be applied to a single cell or selection in the grid. Select cells by clicking on one and dragging your mouse cursor, or hold Shift and use the arrow keys. |
| Duplicate once (Ctrl / Control + D) | Applies to the current cell or selection. Duplicates once and moves the selection to the duplicate (for further duplicating or manipulation). |
| Duplicate to end (Ctrl / Control + E) | Applies to the current cell or selection and will duplicate the contents to the end of grid. A very quick way of building up patterns. |
| Insert Row (Ins) | Inserts a row and moves the rows below it down. Note this will delete the last row to make space for the insertion. |
| Delete Row & Shift Up (Ctrl / Control + Backspace) | Deletes the current row and pulls the rows beneath upwards. |
| Shift Events Up (wraps) (Alt / Option + Up) | Cycles the rows upwards with the top row that disappears appearing at the bottom (wraps, doesn't delete any rows). |
| Shift Events Down (wraps) (Alt / Option + Down) | Cycles the rows downwards with the bottom row that disappears then appearing at the top (wraps, doesn't delete any rows). |
| Reduce gate by offset amount to prevent overlap (G) | When shuffle (11) or the start offset (26) is used to delay the row's start, the gate amount will automatically be reduced to prevent notes overlapping. If off, the gate will remain as is and notes can overlap. |
Note these items may change depending on what column (23 to 27) is selected.
| Cell entry (F2) | Displays text entry for a cell with caret to allow you to type in a value directly. |
| Inc (+), Dec (-) | Adds or subtracts to the current cell or selection. In the case of events, this will be by 1, for value columns (24 to 27) this may change values by jumping (see fine below). |
| Inc / Dec event transpose (Ctrl / Control + +/-) | Introduces a transpose amount to the current event cell. |
| Inc / Dec event transpose +/- 12 | Introduces a transpose amount to the current cell that goes up or down by octave (+ or - 12). |
| Inc / Dec fine (Ctrl / Control + +/-) | This option becomes available when one a value entry column (24 to 27) and allows fine (by +/- 1) adjustments of the value. |
| Inc / Dec same values (Alt / Option + +/-) | Will adjust only the same values in value columns (24 to 27) and leave other values the same (unless the value becomes them, then they'll all move together). This can be a quick way of adjusting all similar values. Use Control / Ctrl in addition to this for fine adjustment. |
| Legato / length (L) | Applies to a selection (greyed out otherwise). Will look at the event rows content selected and automatically stretch the gates to create a legato effect. If only one one even is selected with a selection that doesn't overlap other event numbers, it will give that even the selected length. |
| Insert transpose progression (T) | If you have 3 notes held, such as C-E-G, this will insert a progression e.g. 1, 1+3, 1+7 to match the transpose of the held notes, allowing a one note chord. |
| Event fill selection (F) | Will fill out progressive notes down or left depending on selection. e.g. if you have 1 selected, then it can file 2,3,4 etc. in the selection. |
| Value ramp (R) | If you are editing Gate (24), Velocity (25), Start Offset (26) or CC (27) columns, you can place a low and high value on separate rows, select them, then choosing this will automatically calculate and fill in the steps in-between. |
| Line move increment (Ctrl / Control + [1 to 8]) | By default, the cursor key arrows will move one at a time. Engaging this can make them jump more than one at a time (1 to 8). |
5. MIDI Export Menu (20)
All the export options related to how export drag & drop (21) will export MIDI to the timeline.
| Export: Just played note performance (X steps) | Retrospective recording. Everything you play is recorded until the arp stops and starts again (starting again will clear). X indicates the number of steps recorded indicates the current recording size. |
| Export: Pattern with last pressed input note(s) | This will export the pattern with the last pressed notes. You don't need to play the entire pattern, just hold some notes and then export. This can be quite quick when you know the different chords for example and what to press, export, press export without having to play through. |
| Export: Last pressed long input note(s) | Will export long notes, primarily for triggering the arp from the timeline. Can be quicker than playing then quantising in the DAW for example. |
| Adjust note sequence to BPM normal speed | When you play something slower, when dragged to the timeline, this will readjust speed to the projects tempo if on, and off will leave at the current BPM. Or simply changing the BPM back to normal then dragging will do the same. |
| Length | These 4 options related to the 2nd and 3rd export options. If you have a small pattern of say just 3 notes, then selecting 16/32/64 will keep looping those 3 notes in the case of the 2nd export mode to create a longer MIDI part of the desired step length. Per pattern uses the pattern length. |