H-Arp Manual
MIDI Export

H-Arp includes 3 flexible drag and drop MIDI export modes that allow you to instantly drop MIDI notes onto your DAW's timeline. In this way H-Arp can act as a scratchpad to creating riffs for your DAW, which you can then further evolve inside its piano roll. Exporting can also be a good reference point to see the notes it is generating, which I often do in the demo videos.
Coming from a tracker background, part of my motivation with H-Arp was to allow riffs to be programmed and improvised to generate ideas quickly. Using MIDI export is complementary to this objective and allows detailed piano roll parts and variations to be quickly placed by using H-Arp as a helper companion in this mode.
Continuously recording
H-Arp is always recording what you do. Every note or chord pressed at a particular step whilst the arp is playing is stored. So when you nail a riff, you can simply export what has been played to your DAW's timeline. The best riffs are often made in the moment or by happy accident, so this is often useful to get out those otherwise lost performances that you might not get right a second time.
The way it works is every time you start playing, the previous recording of notes will clear and the next start without you doing anything. When the arp stops, the recording also stops, and it is then available to be exported to the DAW by drag and drop before you start playing again. This allows you to practice and when you get a good take (or a less bad one!), you can pull it onto the timeline.
Exporting
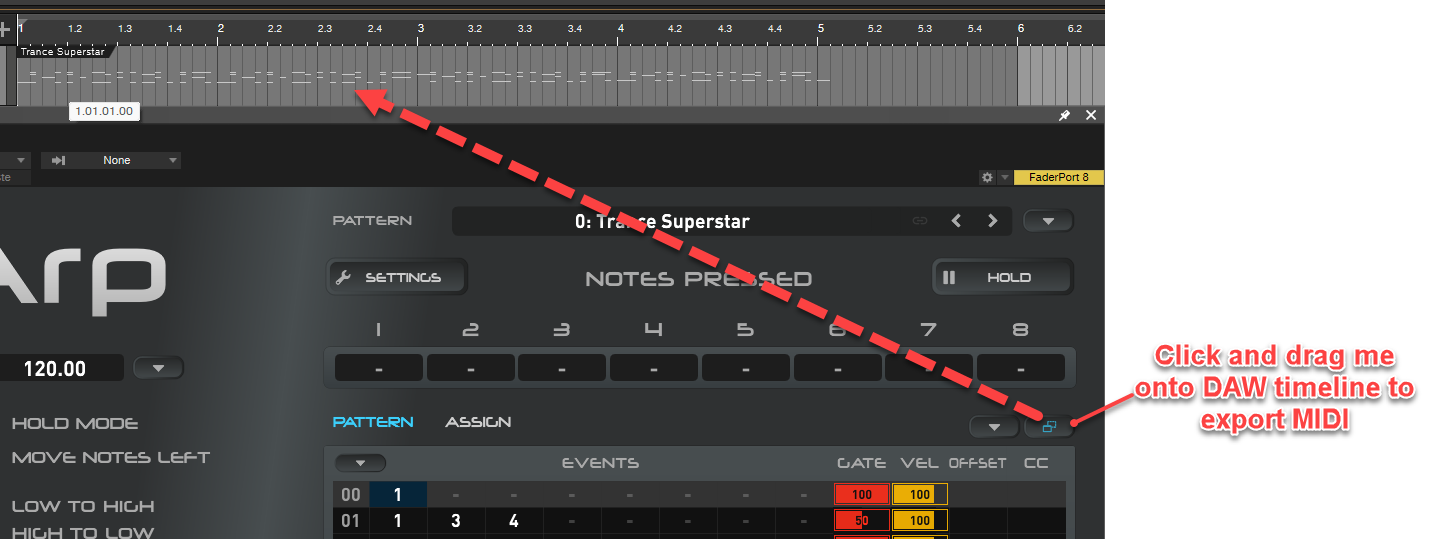
To export, simply click and drag the icon shown in the first screenshot above onto your DAW's timeline, that's it. If the icon is not yet enabled, it means you haven't playing anything yet and the recording buffer is empty.
Export Options

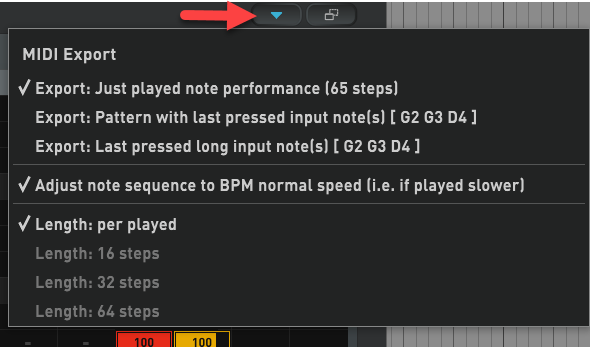
The button immediately left of the drag and drop export button shows the MIDI Export options menu with the 3 exports modes.
- The first one tells us 65 steps have been recorded. If the arp has been continuously playing it will have gathered up all your playback include note or chord changes you have performed, ready for instant export. Tips:
- Hold mode can be good to ensure continuous and easier playing.
- Lowering the speed (BPM menu) H-Arp can respect what you played at a slower speed and speed it up again to project tempo for export (Adjust note sequence to BPM normal speed option above).
- H-Arp supports a sustain pedal press to keep the arp running even if notes aren't playing, so this keeps it running and adds to the recorded step count also.
Length
Per played steps / 16 steps / 32 steps / 64 steps.
This applies to the 2nd and 3rd export modes. These modes are simply about tapping some notes then immediately exporting what the pattern would be using those notes (2nd option), or exporting the long notes pressed so they can trigger the arp (3rd option). No need to play through the full sequence in these modes, you can simply tap a chord then start dragging out to export the current pattern as H-Arp calculates what the pattern would be instantaneously for the given notes and selected length chosen. Chained patterns are also respected.
Use cases:
- Say you have a simple 3 step pattern (steps set to 3). Setting length to 64 steps and just tapping the notes will instantly tell H-Arp to loop the 3 step sequence for 64 steps using those notes when you export.
- Sometimes you just want to throw down exports to the timeline of the pattern with different known chords or key changes. The 2nd mode Pattern with last pressed input note(s) is great for this and building up a timeline of parts quickly that have those different chord changes applied without having to play the sequence out fully like you would in 1st export mode. Tap different chords and keep dragging to timeline, the length set will be respected and looped out to fit.
- The 3rd export mode Last pressed long input notes lets you drag out the long notes to feed the arp (length setting determines length) and again build up timeline parts quickly. In the two track approach (DAW setups), you want to export these notes in H-Arp's track (more on this below).
- This is intended as a timesaver for exporting out long notes just pressed to feed the arp versus having to DAW record them or draw them in your DAW’s piano roll, both of which are usually slower and break H-Arp’s spirit of instantaneous adventure!
- Tip: if your DAW supports MIDI clip stretching on the timeline (often extending the clip with a hotkey to grow/shrink the notes along with it too), this can be handy to adjust arp playback duration (which is note fed).
- Note in this export mode when the pattern has a Order Pressed note priority, it will attempt to export the notes pressed slightly staggered to reflect this to allow H-Arp to be triggered as expected. This isn’t an exact science that it can get all notes timed for the first step and the part may need to be nudged back slightly to fit timing. Assigning a single note to play the notes pressed in the intended order is also a way of resolving thid for this (see Assign).
Note when you export notes to the timeline, depending on setup, you sometimes want to disable the arp (by clicking logo or DAW’s plugin disable) so those short notes generated aren’t sent back through the arp to re-trigger the arp again (effectively putting the chopped notes back through the blender again!).
For the first two modes, in a two track DAW Setup, drag the MIDI notes onto the instrument’s track (not H-Arp’s track) to have it play back as expected. In a single track mode like Bitwig/Logic/Reaper offer, drag to this track but then disable the arp. These modes both provide post-arp chopped notes, so you want to direct those exported notes straight to the instrument, not back through the arp again, which will sound odd.
The 3rd mode you would want to export onto H-Arps track in two track mode, or in single track mode export to that track but keep the arp enabled, since these are the long trigger notes used to feed the arp (pre-chopped).

