H-Arp Manual
Pattern Grid
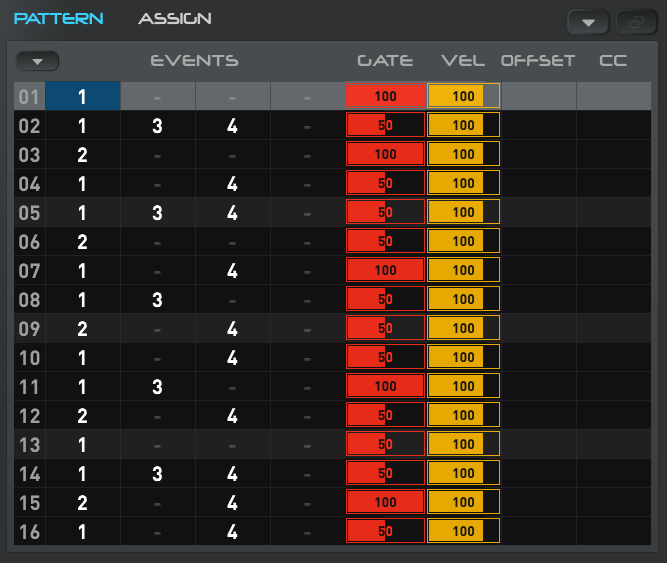
We looked at the basics of this area where numbers go to trigger our pressed notes at different step times, so let’s go into a bit more detail about this area.
- Info
- Navigating
- Selection
- Setting Cell Values
- Event Transpose
- Gate, Velocity, Offset
- CC (Controller Values)
1. Info
- Shown above we have 4 event columns (the cells before gate with the numbers). Resizing the interface to be wider (dragging from bottom right if window) can show all 8.
- It doesn't matter what number goes into what cell, they'll still play the corresponding Notes Pressed slot, i.e. the numbers don't need to align in corresponding cells under notes pressed.
- The playback engine will remove duplicate notes going out, so if you have two 1s next to each other, only one will play. If transposing (see below) resolves to duplicate notes on the same step, again only one will play.
2. Navigating
- Click onto a cell and you'll see it turns darker blue (by default) to indicate that it’s the current cell (skin dependent). The row also get highlighted to convey the editing row, tracker style.
- Use arrow keys to move around, or your mouse to click to move to another cell.
- Use Page Up & Page Dn keys to jump by 4 rows vertically up or down.
- Home and End to go to top or bottom, or CTRL + Home or End to go to the far left or right respectively.
- Ctrl + 1,2,3,4,5,6,7,8 can set a jump amount (1 is the default), which means after typing in a number into the grid it will then jump by the number of steps set here. This can be useful for putting in say 4/4 beats.
- Unlike a tracker, the playing row highlighted is separate from the editing row, so you are free to move around and edit during playback (trackers usually tie the two). There is also no offscreen grid scrolling, all 16 steps are shown at once for simplicity.
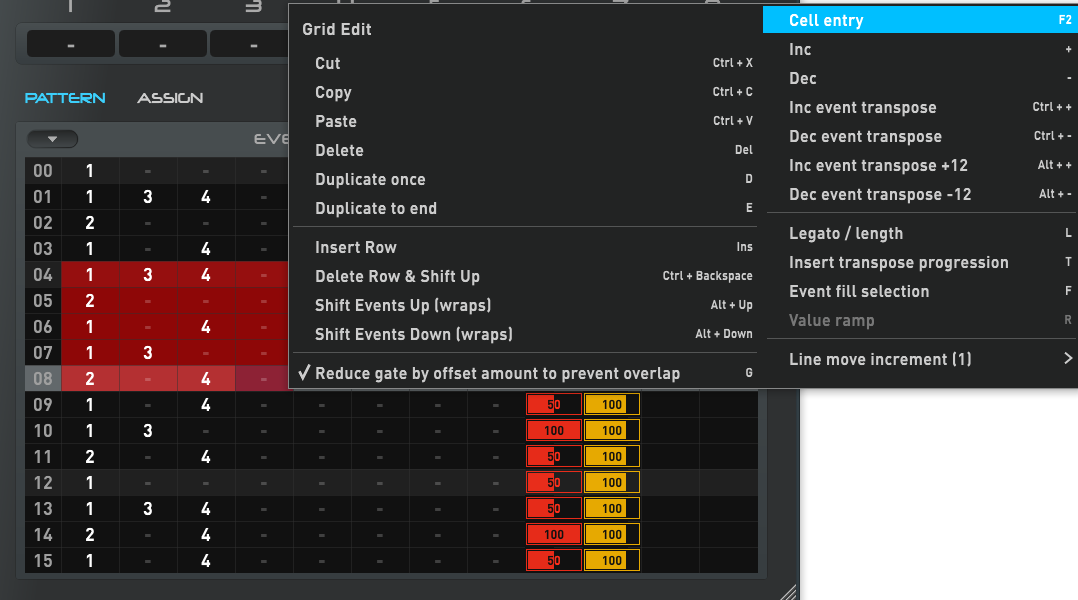
3. Selection
- Press Shift and use the arrow keys to create a selection square.
- Or click the first cell and while holding the mouse button down, drag out a selection square. Selected cells turn red.
- Click the row number on the left, this will highlight a full row. Drag up or down on the row number will highlight more full rows, like a spreadsheet.
- To clear the selection, simply press a key or click to move away to another cell.
Below shows a selection example (red). Many options in the Grid Edit menu shown can apply to selections and some are context sensitive to the cell or column(s) you have the selection in.
4. Setting Cell Values
- Use + or - keys to increment the value of a cell or what is currently selected.
- Ctrl and + or - will set a transpose on event cell(s).
- Ctrl and + or - variations exists for fine adjustment on the value columns (Velocity, Gate, Offset, Repeat, CC).
- Alt and + or - varation exists for transposing up and down by 12 (see transposing below).
- Double clicking or pressing F2 puts a cell into text edit mode, where you can type in a value, e.g. "1", "1+5" (see transposing below), "100" etc.
- Making a selection then using + or - with the variations can apply to the whole selection.
- Note there is no mouse moving to set say Velocity, Gate, Offset, Repeat, CC slider values in the grid, we are in tracker territory where things are typed in quickly or (ctrl) +/- offers quick adjustment!
- Cut, copy, paste, duplicate (once or to end), fill, value ramp, enter transpose sequence provide quick ways of duplicating or completing values, see Interface & Menus Pattern Menu for more details.
- The idea with the menus in H-Arp is that you might go into them the first few times for an option, but over time you can take note of the keyboard shortcuts listed next to options so you can evolve onto using them instead, getting even more faster at making adjustments if you like.
5. Event Transpose
As well as entering note events, we can also choose to transpose the event by a number. Transposed notes have a “+” after the slot number per below (or can have a "-" to go downwards).
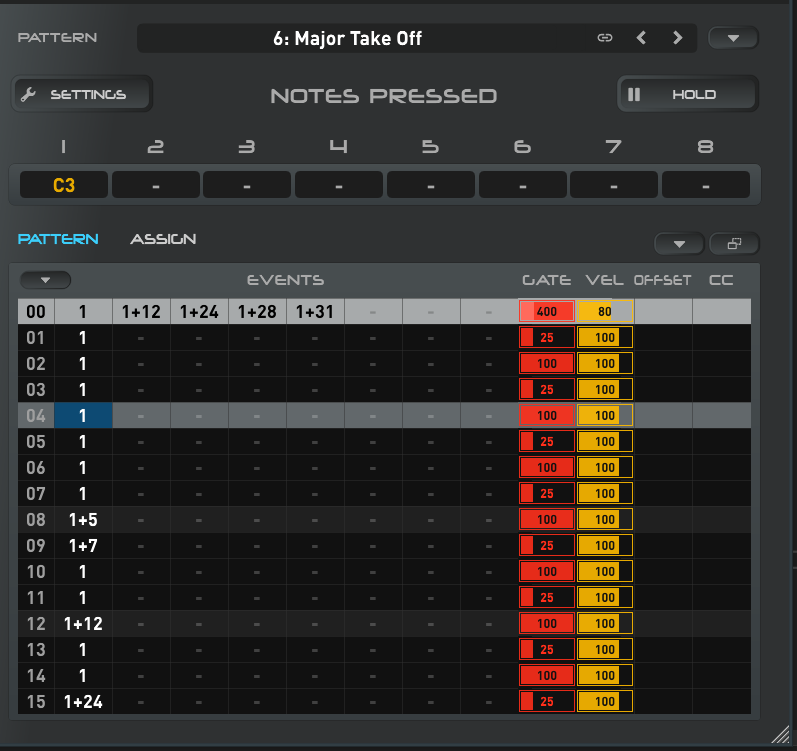
The demo pattern Major Take Off is a good example of transposing. It only has one event number "1", meaning you just need to press one note (C3 in example), but it is using transpose to manipulate that one note into a chord in the first step (00) and also performing further transpose adjustments in steps 08, 09, 12, 15. In this way you can make a one note press do quite a lot!
- "1+5" (step 08) means play the note in slot 1, but transpose it by +5 semitones. So here that C3 turns into a F3 (+5 notes up on the MIDI keyboard) so that is played instead. Negative transposing using “-” can also be set to go down.
- The first step (00) takes our C3 note and adds 4 more notes alongside it to octave shift the C3 and then create a major chord two octaves up to get C4 C5 E5 G5 playing. +12 is exactly one octave up (C4), +24 two octave ups (C5) etc. Play around to see what sounds good.
To add a transpose amount to an event, you can double click or press F2 on the cell to put the cell into text entry mode, then type "1+3" (no quotes) and enter. Alternatively, CTRL and + or - will increase or decrease the transpose amount by 1. ALT and + or - will transpose by one octave (+/- 12) at a time.
Note that transposes that would cause a note to go beyond the lower or upper MIDI limit are ignored and the note will play without.
6. Gate, Velocity, Offset
GATE is the length of time notes in a row will sound. The value range is 1 to 1600. The default is 100 and means a full step, or 100% of a full step (1/16th note length).
• 50 will play for a 1/2 of a step (50% or 1/32th).
• 25 will play for a 1/4 of a step (25% or 1/64th).
• 400 will play for 4 steps (400% or 1/4th).
• 1600 will play for 16 steps etc (1600%).
You'll find this number system corresponds somewhat to the note duration info reading in most common DAWs, it is an abbreviated version as shown below.

Note Gate Reduce % on the left. This will reduce the gate by a percentage behind the scenes. This is for when MIDI note offs needs to be brought back slightly for the specific instrument. If you hear notes "smear" into each other then the chances are the instrument doesn't quite like head-to-tail note ons/offs being received, so the note offs can be reduced slightly for it to sound right (or for creative reasons).
Gate lengths will travel across patterns if they go beyond the patterns length and will play out their length as long as the arp is playing.
VEL is the velocity that notes in a row will be triggered at. The value range is 0 to 127. The default is 100, and you can set this default in the Settings menu to a few different options.
Note a "0" velocity note can also be the same as a note off on many instruments and might be useful in some cases.
Also note in the screenshot above, Studio One shows the velocity as 79%. This is correct, since 79% of 127 is 100 (H-Arp's unit).
OFFSET is start offset (delay) before the note starts and is off by default. When set it indicates the percentage of a 1/16 the note start time will be delayed by before playing. The value range is 0 (off, no delay) to 67 (2/3rds).
If you adjust Shuffle on the left, note the offset on odd rows will change accordingly, indicating how this start delay (offset) works to shuffle notes. Note when shuffle is greater than 0, these odd row offsets become non editable in the grid.
You can use manual offsets to "humanise" the pattern or for other rhythmic effects.
When using offset, the gate time (note length) of the note by default is automatically trimmed by the offset amount to remove possibly undesired overlap if it is 100 or less. The setting Reduce gate length by offset amount to reduce overlap (Pattern Menu) controls this and can be switched off there if desired.
REPEAT isn't shown by default but appears when you click the OFFSET column heading (it's a toggle between showing offset and repeat, though both will apply). Repeat will chop up the note and play it in shorter segments within the same step. A repeat of 1 does nothing (off/default), 2 will half the note, 3 (the maximum) will put it into 1/3s (triplet). Repeat respects the current GATE length, Gate Reduce % and OFFSET.
7. CC (Controller Values)
CC - each step can transmit a MIDI CC value just before the note on messages are sent for a row. Up to 127 different CC control change messages with corresponding value can actually be sent per step row (yes controlling 127 controls at once would be excessive but possible if the instrument can handle it!).
The CC value column behaves slightly different and is based on the currently selected CC message number on the left (0 to 127). It indicates what values should be sent for the currently selected CC message code. Changing the CC message code on the left will give you another column to enter values into and the dropdown next to CC on the left reminds you of what CCs are in use and allows you to switch between them quickly.
Typical uses might be adjusting the cut off filter, resonance, pan, or other control manipulations on the target device on a per step basis. Some DAWs like Bitwig can take a CC and convert it to manipulate a plugin's parameter, but for those that don't (most), you'll need to use the MIDI learn functionality of the instrument to pair the CC or find out the fixed CC number.

- Above shows the current CC message code (74) to be sent. This is common code for filter cutoff (sometimes known as brightness). For a full list of suggested CC message codes, see https://midi.org/midi-1-0-control-change-messages
- This dropdown reminds us what CC message codes we've used so far, 71 (common for resonance) and 74 (current) in this case.
- Shows the values to send per step for the current code (74). Switching to 71 it could have a different set of messages to be sent in tandem.
Pairing CCs
Some soft synths and especially hardware synths are set to receive fixed CC code messages and often have a MIDI implementation chart in their manual. Example soft synth manufacturers such as Korg have common fixed codes set (e.g. 74 for filter cut off).
For soft synths like Diva, Arturia V-Collection and many others with MIDI learn ability, what to do is:
- In H-Arp, set the desired CC MIDI message code on the left, 74 in this case for filter cutoff (could be anything).
- Put the synth into MIDI learn mode and choose the knob or slider you want to assign to, e.g. filter cut off.
- In the CC column (3 in screenshot above), click a cell in that column and start pressing the + to change the value of that cell (while playback is stopped). You'll see the synth has then learnt it and changing the value in H-Arp should now be changing the filter knob or slider position. Note Settings > Send CCs While Editing needs to be turned on (on by default). During playback, edited CCs aren't sent until the step is arrived at.
- By changing the CC message (1) then repeating this process, you can tell the synth to learn and assign many CCs to different knobs or sliders for manipulation.
Also note in the screenshot above, I used the value ramp function. Put "1" in the CC's first cell, "127" in the last (or further down), make a vertical selection that includes both, then press R (or select the option from Pattern Menu). This automatically calculates and fills values between the first value and the last, spreading them evenly. Start and end numbers can vary and this applies to the other value columns too.